How to upload a sticker pack on Stipop
Looking to launch a sticker pack for your fans? Well, you came to the right place. In today’s post, we will share a quick guide on how to upload your sticker pack on Stipop Studio and launch your stickers to iMessage, WhatsApp, and Telegram all at once!
Stipop Sticker Pack Upload 101
1. Sign up
First things first, before uploading stickers, you need to sign up. To do that, click here to sign up in just a minute. There is no upfront cost so you can get started right away!
If you have any questions regarding signing up, reach us at artist@stipop.io. Now, let’s see how you can upload stickers from here.
2. My Studio
Already signed up, it’s time for you to visit My Studio – which is where the magic happens! The My Studio page is accessible from the Studio website and it gives you access to your own platform to manage and upload sticker content on Stipop. Here, you have access to data reports that show you how your stickers are performing worldwide and your own wallet – which lets you know how much you have earned from your content!
From here, click Upload from the left menu and select whether you want to upload a static (PNG) pack or an animated (GIF) pack.
2.1 Sticker Pack Info
The process starts with adding basic information about the sticker pack. This includes
Sticker pack name and the main language of the pack
Character or series name - “Pikachu, SpongeBob, etc.”
Description of the sticker pack - “This cat character flew from outer space..”
Category
Pricing
Regarding the sticker pack pricing, you have options to select Free, Paid, or Premium sticker packs. Paid and Premium sticker pack pricing varies depending on the sticker pack type (static or animated). To learn more about pricing, click here.
2.2 Upload stickers

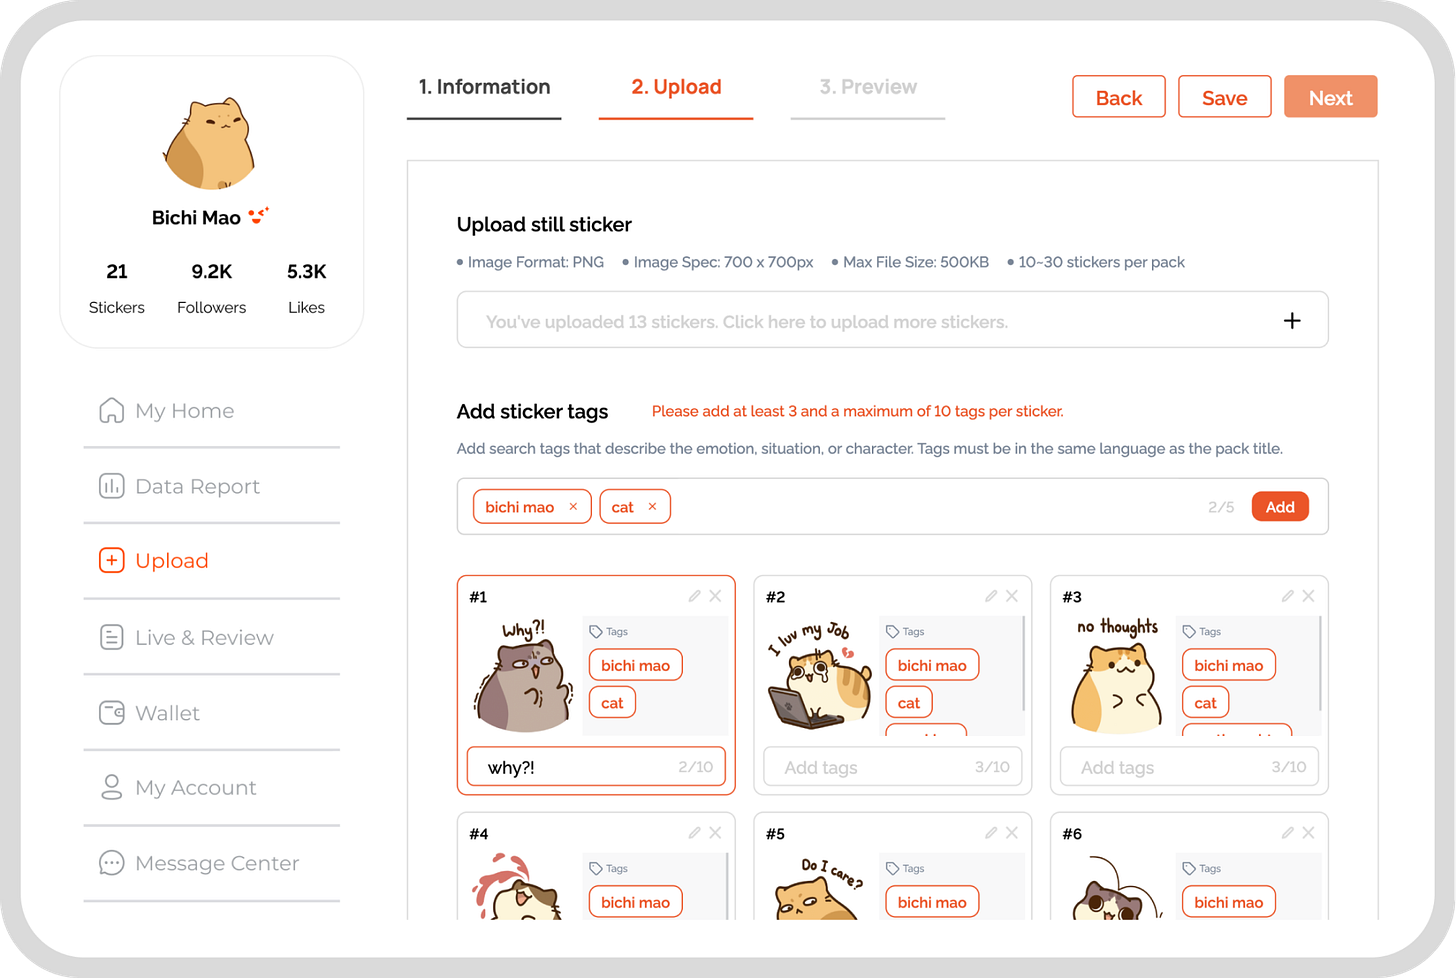
Next, it’s time to upload the sticker files. If you are working on a static sticker pack, upload the PNG files here. If they are animated, upload GIF files. You can learn more about the specifics of sticker files in the Guidelines page. In short, you should be uploading 10~30 sticker files here.
Once the files are uploaded, you’ll see an option to enter sticker tags (or keywords) below each sticker and a bulk tag option. First, use the bulk tag option to add tags that apply to all of the stickers (for example, if your character is a cat, “cat” would be a good bulk tag), and then add action or emotion-related tags to each sticker.
Pack name
Character name
Character type – is your character a dog? a baby? a tomato?
Pack theme – is your pack about summer? fall season?
Emotion – is your sticker pack full of funny stickers? or super cute designs
Action – are your stickers running? jumping? laughing?
You can always use synonyms to optimize the chance of your pack being found by users. After you finish writing down everything, make sure there are no typos!
2.3 Preview
Only one more step to go! Check the sticker order and click on a sticker to make it the main sticker of the pack. Finally, add the app tray icon (100 x 100 px) which is a small icon that users click to open the pack on iMessage.
Once you are all set click Submit to upload your sticker pack for a review. The review will typically take 2~5 business days. During the review, the Stipop content team will make sure that all the sticker files are ready for all the different messengers. Once it’s live, you will be notified through the email. You can also see the stickers you’ve uploaded on the Review page.
Are you a creator?
Looking to grow your audience? Stipop is the perfect place for you. With more than 5,000 sticker creators and 200M end-users worldwide, Stipop elevates all types of creators to a wider audience of sticker fans. To learn more about becoming a sticker creator at Stipop, visit our Studio page. To stay on top of new stories and community updates, make sure to visit Studio blog!


